1 Preface
The combustion chamber shell of a certain model of engine is composed of a front connecting piece, a thin-walled spinning cylinder, a rear connecting piece, and a support, which are processed by a combination of argon arc welding, heat treatment, and sandblasting. There are 2 rows of 20 axial supports welded on the outer surface of the thin-walled shell of the combustion chamber, and the design drawing of the supports requires a thread accuracy of M4-6H. The support thread is used for installing missile cable covers, and the thread connection requires high quality and reliability. Due to the limitations of the support structure, material, and spatial structure at the welding point with the combustion chamber shell, traditional processes are used to process threads, resulting in a low product qualification rate. This article conducts process analysis and research on various stages of product processing, and through experimental verification, comparison, and analysis, obtains a reasonable and effective thread accuracy control method.
2. Product Structure Characteristics and Processing Difficulties
2.1 Structural characteristics
The outer dimensions of the combustion chamber shell are relatively large, with an outer diameter of 50{{10}}mm and a length of 4500mm. The support is manually welded to the outer surface of the combustion chamber shell, with a radial span of (114 ± 0.2) mm. The combustion chamber shell and support materials are both made of D406A ultra-high strength steel. The support structure of the combustion chamber shell is shown in Figure 1. The support has an elongated circular structure with an outer diameter of 14mm and a width of mm as shown in the picture. There is an internal thread M4-6H at the center, with a pitch of 0.7mm. There is only a 0.7mm gap between the groove at the bottom of the thread and the thin-walled shell.

Figure 1 Combustion Chamber Shell Support Structure
2.2 Processing difficulties
The processing flow of the support is shown in Figure 2. If the threaded holes of the support are arranged for processing after welding and heat treatment, there are several difficulties [1].
1) The gap between the bottom of the threaded hole of the support and the shell is only 0.7mm, which can easily damage the surface of the thin-walled shell during mechanical processing, posing a quality hazard.
2) The gap between the groove at the bottom of the threaded hole of the support and the shell is small. During thread processing, the guide of the tap is short, the positioning is unstable, it is difficult to tap the thread, and it is prone to machining deviation. The verticality of 0.04mm cannot be guaranteed.
3) The hardness of the material after heat treatment is 48-52HRC, which can easily cause tap breakage during thread processing. Due to thread issues, the shell is scrapped, resulting in high manufacturing costs and quality risks.
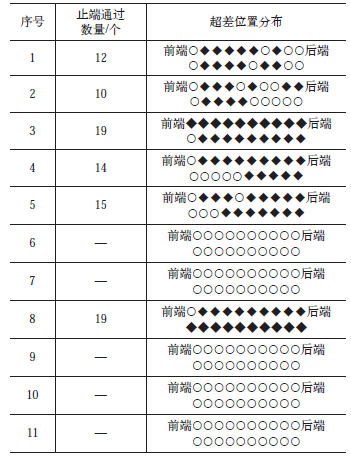
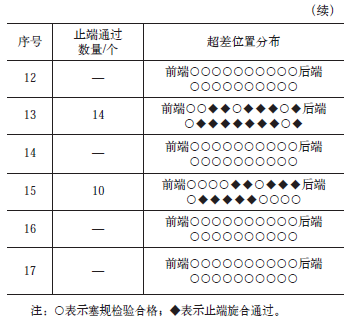
Based on the above analysis, it can be concluded that the support threads need to be machined before welding, and then annealed, sandblasted, quenched, and tempered together with the combustion chamber shell after welding. After quenching treatment, the surface of the support thread undergoes oxidation, and there is excess residue attached to the surface of the thread profile. If the thread of the support is processed in place before welding, and after the combustion chamber shell is combined and processed, use an M4-6H tap to clean the excess material attached to the surface of the support thread profile. At the same time, it will cause the oxide layer on the surface of some internal thread profiles of the support to fall off. When using M4-6H thread gauge for inspection, the qualification rate is only 67%. Statistical analysis was conducted on the machining of M4-6H internal threads on 17 combustion chamber shell supports, as shown in Table 1. How to improve the machining accuracy of support threads has become an urgent technical problem in product production and delivery.

Figure 2 Processing Process Flow
Table 1 Statistics on the machining of M4-6H internal threads on 17 combustion chamber shell supports


3 Technical solutions and process tests
3.1 Technical Proposal
After reviewing, inspecting, analyzing, and troubleshooting various processes during the processing of the combustion chamber shell and support, it is believed that the main reason for the dimensional accuracy of the M4-6H internal thread of the support exceeding the standard is that after quenching treatment, the surface of the support thread undergoes oxidation, and there is excess residue attached to the surface of the thread profile. While cleaning the excess material on the thread surface, it may cause the oxide layer on the surface of some of the internal thread profiles of the support to fall off, resulting in poor accuracy of the M4-6H internal thread of the support.
Option 1: Customize a specialized hand tap, divided into a head tap and a second tap, and control the pitch diameter size of the head tap. Use a head cone to tap the thread in the state of the support parts and reserve machining allowance. After heat treatment of the combustion chamber shell, use a two cone tapping support thread to ensure the final accuracy of the thread.
Option 2: Increase the thread accuracy of M4-6H by one level in the state of the support parts, process according to M4-5H, effectively compensate for the difference between M4-6H and M4-5H, and meet the thread accuracy requirements [2].
3.2 Test process and results
The first process plan is carried out in three steps. ① Customized special tap (head tap and second tap), with reserved allowances for the pitch diameter of the head tap of {{0}}.30mm, 0.20mm, and 0.10mm, respectively Use a head cone to tap the thread during the machining of the support parts. ③ After heat treatment, use a double cone to tap the thread. Due to the high hardness (48-52HRC) of the material after heat treatment, and the influence of the large diameter structure of the combustion chamber shell, the difficulty of threading operation by operators increases, the force is uneven, and the cutting force is prone to deviate from the axis. When the diameter allowance during the experiment is 0.30mm, it is impossible to cut the threaded hole when using a two cone tapping thread; When tapping with a diameter allowance of 0.20mm and 0.10mm respectively, there may be deviation of the threaded hole or breakage of the tap, making it difficult to ensure product quality [3].
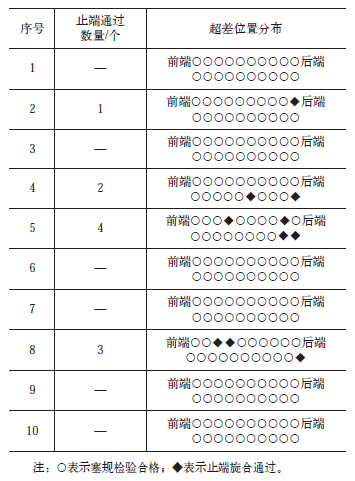
According to the second process plan, the thread accuracy of the support is improved by one level of processing. The machining situation of the M4-6H internal threads of 10 combustion chamber shell supports is statistically analyzed, and the data is shown in Table 2. The thread accuracy has been greatly improved, and the product qualification rate has increased from 67% to 95%.
Table 2 Statistics on the Internal Thread of the Processing Support in Scheme 2

3.Analysis of experimental results
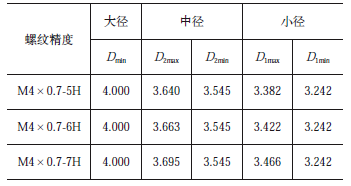
By summarizing and analyzing the experimental results of Scheme 1 and Scheme 2, according to the processing method of Scheme 2, the qualification rate of the support thread has been significantly improved. The M4-7H thread gauge was used to inspect the out of tolerance threads, and all results were qualified. Compare the accuracy dimensions of M4-6H, M4-5H, and M4-7H threads, as shown in Table 3.
Table 3 M4 × Precision dimension of 0.7mm internal thread (unit: mm)

It can be seen that the pitch diameter size of thread M4-5H is mm,The pitch diameter size of M4-6H is
 mm,The pitch diameter size of M4-7H is
 mm.The maximum limit size deviation between 7H and 6H is 0.032mm, and the maximum limit size deviation between 6H and 5H is 0.023mm, indicating that the thread accuracy of the unqualified support does not exceed 0.032mm. In order to compensate for the over tolerance, the thread accuracy in actual machining has been improved to 5H, with a compensation amount of 0.023mm, which can basically meet the requirements of thread compensation. For individual cases of thread accuracy exceeding the tolerance, it can be considered that the tolerance is very small, with an accuracy between 6H and 7H [4].
4 Improvement measures and process validation
1) When tapping threads on the tapping machine, the spindle will experience slight oscillation. As the processing depth changes, the cutting time at the thread mouth is relatively long, and there will be slight differences in the size between the mouth and the root. The method of tapping the thread from the back of the support thread is adopted to compensate for the slight changes in the mouth and root during the machining process [5].
2) Improve the accuracy of thread gauge detection. The thread of the support is still processed with M4-5H accuracy. When using a thread plug gauge for inspection, it is required that the go gauge is fully screwed in and the no go gauge is screwed in no more than one turn.
3) In the sandblasting process before heat treatment of the combustion chamber shell, it is necessary to protect the support threads. The previous process method of using M4 screws for protection needs to be changed, and a special protective screw with an accuracy of M4-6f needs to be redesigned. The length of the thread should be controlled within one turn to avoid multiple rotations and wear.
4) Change the cleaning method. After machining the combustion chamber shell assembly, use compressed air to blow off any excess material in the threaded holes of the support, and then use a thread plug gauge M4-6H to inspect. If it cannot pass, clean it with M4 screws first, then clean it with a tap M4-5H, and inspect it with a thread plug gauge M4-6H after cleaning.
After multiple process tests and verifications, the thread accuracy of the support fully meets the product accuracy requirements, and the product qualification rate has been increased to 100%, completely solving the problem of thread accuracy of the support.
5 Conclusion
1) Improve the thread accuracy by one level during machining in the part state, and adjust the thread accuracy of the support from M4-6H to M4-5H.
2) During the processing of the support thread, it is processed from the welding surface (back), and after heat treatment and quenching, it is inspected from the front to compensate for the dimensional differences between the mouth and the root during the processing.
3) Special protective screws are designed for the sandblasting process to reduce compression on threaded holes.


